Monday, March 14, 2011

Cinnamon Roll Cookies

In case you haven't noticed, this is a continuation from my last blog post. I guess I was feeling unusally lazy, and wanted to publish this in two posts. I'm not quite sure if my last two sentences made any sense at all; but hopefully you have followed my train of thought. (:
Now, back on track. These. Cinnamon. Roll. Cookies. Are. AMAZING. I can't say enough about these cookies. Yes, they're quite a laborious process. But these cookies are definitely worth it. I would suggest decreasing the amount of sugar in the dough by 1/8 to 1/4 cup; depending how sweet you like your cookies to be. But for me, I like my desserts a little sweeter...
And these cookies were so delicious that I might've ate more than one... or two... or four...
You get my point. By hey, mixing the dough and taking trips down to the refrigerator count as exercise right?


The visible cinnamon roll swirl ...


Cinnamon Roll Cookies
Adapted from http://www.mybakingdom.com/
Makes 4 dozen
Ingredients

FOR THE COOKIES
1 cup (2 sticks) unsalted butter, softened
1/2 cup brown sugar
1/2 cup sugar
2 eggs
1 teaspoon vanilla
2 teaspoons cinnamon
3 cups flour
2 teaspoons baking powder
1 teaspoon salt

FOR THE FILLING
1/4 cup (1/2 stick) unsalted butter, very soft
1/4, plus 2 tablespoons packed brown sugar
2 teaspoons cinnamon

FOR THE ICING
2 cups confectioners’ sugar
2 tablespoons melted butter
1/2 teaspoon instant espresso powder
2 teaspoons vanilla
2-4 tablespoons milk


To make the cookies: In a medium bowl, combine the flour, cinnamon, baking powder, and salt; set aside.

In a large bowl, or the bowl of a standing mixer, cream the butter and sugars together until light and fluffy. Add the eggs one at a time, and beat until just combined. Scrape the sides of the bowl, then add half of the flour mixture and mix until just combined. Add the remaining flour mixture and beat until thoroughly combined, scraping the bowl as needed. Scrape the dough into a ball in the center of the bowl, cover with plastic wrap, and chill in the freezer for 30 minutes, or the refrigerator for at least an hour.

Once the dough is chilled, divide it into two equal halves. Place one half back in the bowl and put it back in the refrigerator for now. On a large piece of plastic wrap, pat the first half of the dough into a rectangle about nine inches by twelve inches, and about half an inch thick. Place half of butter on the dough and spread it all the way to the edges. Sprinkle half of the brown sugar evenly over the buttered dough and press the sugar into the dough. Finally, sprinkle half of the cinnamon evenly over the dough. Use the plastic wrap to tightly roll the dough into a log. Place the log in the freezer for 30 minutes or the refrigerator for at least an hour. Repeat with the remaining half of the dough and filling ingredients.

Preheat the oven to 350 degrees. Line a baking sheet with Silpat mats or parchment paper.

After the dough has chilled again, slice each log into half inch slices (about 24 per log). Place on the prepared baking sheets and bake for 10 to 12 minutes. Transfer to a wire cooling rack and allow to cool completely before icing.

To make the icing: In a medium bowl, combine the butter and instant espresso powder. Add the confectioners’ sugar and vanilla and whisk until it just comes together. Next, add the milk, one tablespoon at a time until the desired consistency is reached. It should be thin enough to drizzle, but thicker than a glaze.


With the cookies on a wire cooling rack set over parchment paper, drizzle the icing over the them with your whisk. Allow the cookies to set up for a few minutes before stacking or storing.

Recipe by Sugarbear

Homemade Twix Bars?


Mhmmm. Twix. There's nothing like sinking your teeth into a nice piece of chocolate caramel shortbread. Now, Twix is already pretty amazing on its own. However, I decided to step it up a bit; by making homemade twix. Yeah yeah yeah. I could have just bought a small Twix bar at the local grocery store, but it's nothing compared to this recipe.
I have to admit that I was a little doubtful at the beginning of this baking process. I mean, how's it even possible to recreate a mass-produced candy bar? However, as I took my first hesitant bite, my heart stopped. I now know what heaven tastes like.

Boiling caramel from scratch was a long and patient process; but it was definitely worth it. All the flavors came together so well. Pleaasseeeeee. Take the time off to make this recipe.


Homemade Twix Bars
adapted from Sherry Yard’s, “Desserts By The Yard”
Shortbread
5 1/2 ounces (1 stick plus 3 tablespoons) unsalted butter, softened
1/4 cup sugar
2 cups cake flour
1/4 teaspoon salt
2 tablespoons ground rice (rice processed in a spice grinder until it is able to pass through a fine sieve to remove chunks)*
Make the Shortbread:
Preheat the oven to 350°F. Spray a 9-X-13-inch baking pan with pan spray and line with parchment paper. Spray the parchment.
In a large bowl  cream the butter and sugar until fluffy. Gradually add the flour, ground rice and salt and allow the dough to come together. The dough will be crumbly but should hold together when you squeeze it.
Press the dough evenly into the bottom of the baking pan. Place in the oven and bake for 12 minutes. Rotate the pan from front to back and bake for another 10 minutes, until the shortbread is a deep golden brown. Remove from the oven and allow to cool on a rack to room temperature.
*Several people have asked about the rice. I just used what I had in the house – brown rice, and the results were great. It’s not the same as rice flour because you want to have a little bit of texture. The purpose of the rice is to give the base of this cookie a unique crunch that remarkably resembles the store-bought Twix. This can be omitted without drastically changing the finished product. But I encourage you to try it. I really love the texture it gives.
Meanwhile, prepare the ….
Caramel
2 cups sugar
3/4 cup Lyle’s Golden Syrup (Regular corn syrup is fine)
1/2 cup water
1 teaspoon fresh lemon juice
1 cup heavy cream
1 cup sweetened condensed milk
1/4 teaspoon salt plus more for sprinkling over the caramel layer
Make the Caramel:
Combine the sugar, golden syrup, water, and lemon juice in a large saucepan. Remove any sugar crystals from the sides of the pan by wiping down the sides with water. You can use your hand or a pastry brush. Place the pot on medium-high heat and bring to a boil. Wipe down any stray sugar crystals that appear using a very clean and wet pastry brush. Do not stir from this point on. Keep an eye on the pan. The mixture will be very bubbly.
When the sugar syrup starts to turn golden brown insert a candy thermometer to check the temperature. When it reaches 300°F, remove the pan from the heat and let it sit for 1minute, or until the bubbles subside. Carefully whisk in the heavy cream. Stir until smooth, then whisk in the condensed milk. Add the salt (vanilla salt is very nice here if you have it) Whisk until smooth.
Return the pan to the heat and stir constantly over medium heat until the caramel reaches 240°F. Remove from the heat and pour over the shortbread. While the caramel is warm sprinkle the surface with the best quality salt you have. Kosher is fine, Fleur de Sel is better, Maldon would be my preferred choice.
Allow to set. This will take about 2 hours.
Once the caramel layer has cooled prepare your …
Chocolate Glaze
6 oz bittersweet chocolate, finely chopped (Bittersweet chocolate chips also work)
2 tablespoons butter
Melt the chocolate and butter over a bain marie or in the microwave. If using the microwave melt it slowly – in 30 second intervals. Stir well after each interval.
Once completely melted pour over the caramel.  Using an offset spatula, smooth the chocolate in a nice even layer.
Place in the refrigerator to set. They cut best when chilled.
Cut into desired shape and size. Serve.

Thursday, February 24, 2011

Morucci's Si Mangia Bene!


Morucci's Si Mangia Bene! The name is a tongue-twister; for sure. But no matter how mixed up I get with all the vowels and letters, nothing will change the heavenly bite of their sandwiches. Morucci's is located right by the freeway exit. Actually, it's pretty much in the middle of no where, besides the large residential housing nearby. When I first walked in, I highly doubted the reviews of all my fellow Yelpers, claiming it was "insane." However, the smell and decoration of Morucci's feels just like home. The atmosphere is extremely casual and family oriented.


The fabulous #6 and a 1/2: ciabatta bread stuffed with prosciutto, fresh mozarella, pesto, and tomatoes.
The beautiful #16: A tri-tip sandwich loaded with pickled bell peppers, and swiss cheese.

Mhmmmm... Italy in the form of sandwiches.
You have to make a trip to Morucci's. Trust me, you'll regret not going.

Morucci's Si Mangia Bene
1218 Boulevard Way
Walnut Creek, CA 94595

Wednesday, February 16, 2011

Lobster Scare

I. Love. The. East. Coast.
Although I'm months behind on posting about my East Coast trip; being late is better than never! I know that many people hate the East Coast, and think the weather is too extreme to even be treated as "manageable," but I love the weather. I love the chilliness ... it gives a sense of adventure; as well as a desire to eat. (:
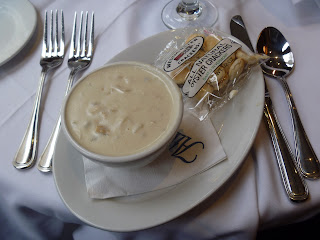
We started out in Boston. Boston is known for the fresh seafood markets and items. So, knowing that, I definitely had to try their clam chowder and lobster! We rushed to the famous and well known Atlantic Fish Company ... and let's just say, I was not dissapointed.

After the waitress took our orders, we were greeted by the aroma of their fresh-baked bread. And let me tell you, after years of loving carbohydrates, this bread was ultimately one of the best.

Then came our clam chowder ...


Oh lobster ...
The food was amazing. However, little did I know that I'm slightly allergic to lobster! My mouth started to swell and become itchy. But, because I love food and was overly excited for the brownie sundae with peppermint ice cream; I postponed any worried thoughts about my allergic reaction.

All in all, the mild allergic reaction was ultimately worth the risk for this seafood feast.

Sunday, February 13, 2011

Nutella Chocolate Chip Cookies

Nutella is the epitome of a happy childhood. It's better than peanut butter, jelly, jam, and to be brutally honest; better than any other spread out there. I found this recipe on lovintheoven.com, and had high hopes for the outcome. I was not dissapointed!
WARNING: BOOKMARK NOW.
You will regret not attempting this recipe! Oh, and yes. This is worth sitting on the couch stuffing yourself with cookies while enjoying a chickflick. I mean, it's Nutella. What's not to love?


Ingredients:
  • 1 1/3 cup all-purpose flour
  • 1 tbsp unsweetened cocoa
  • 1/2 tsp ground cinnamon
  • 1/4 tsp baking powder
  • 1/4 tsp baking soda
  • 1/2 tsp of salt
  • 8 tbsp unsalted butter (1 stick), at room temp.
  • 2/3 cup granulated sugar
  • 1/3 cup light brown sugar
  • 2/3 cup Nutella (chocolate hazelnut spread)
  • 1/2 tsp vanilla extract
  • 1 large egg
  • 1/2 cup semisweet chocolate chips

Directions
  1. Mix together flour, cocoa, cinnamon, baking powder, baking soda and salt. Set aside dry ingredients.
  2. Cream together butter, granulated sugar and brown sugar until light and fluffy. Mix in Nutella and vanilla extract. Mix in egg.
  3. Add flour mixture and mix until just incorporated. Add chocolate chips.
  4. Chill for at least 1 hour.
  5. Drop tablespoons of dough 2 inches apart onto parchment lined baking sheets. Bake at 350 for about 11 minutes until the edges look set. Cool on baking sheet for 5 minutes then carefully remove to cooling racks.

Saturday, February 12, 2011

Airplane Crackers?


Now, as most of you know, airplane food is never that good. And to be honest, airplane food mostly always... sucks. But, this one magical time, I was greeted with a delightful new treat: Southwest Airline's airplane crackers. They tasted like regular Ritz crackers, only they were shaped like planes! These magical crackers helped me live through the next five hours on the plane. These airplane crackers, are magical indeed.

Flour Bakery

Boston, Massachusetts.
My favorite city of all time. Boston's home to some of the most prestigious schools, as well as many famous eateries. Flour Bakery was featured on The Best Thing I Ever Ate; which for those of you unfamiliar with this show, is one of the best shows known to mankind. Yes. I'm being absolutely serious.
As my Dad and I were dragging our legs, walking to our flavor filled experience, we saw a group of runners. They were espescially inspiring... but I was more inspired to eat the food that was awaiting me. As we were waiting for an opening walkway through the runners, we glanced at a man dressed in a costume. A uhmm... present costume.

Now, being at this bakery was already an amazing experience. I mean, Bobby Flay featured this bakery on Food Network, claiming that it had the best sticky bun in the nation. Bobby Flay's amazing presence... adding on the fact that the owner of the store is asian. Yep. Joanne Chang, the mastermind behind this legend, is asian. Flour was packed when I walked in. I was freezing cold in the weather, and my Dad claimed that the coldness was making him hungry. Although I highly doubt the truth in that claim, I had to agree. There were so many choices; it was so difficult to choose twenty items; let alone three. We ordered the reknowned sticky bun, the almond brioche, and the vanilla custard filled doughnut.


The sticky bun was a bit of a dissapointment for me. It was flaky and sticky as the name had claimed, but it lacked the moistness that I was expecting. The vanilla custard filled doughnut is only available on Sundays, and it was amazing. I wolfed down all the almond brioche as well. Flour is a bakery worth revisiting. I can't wait for my next time in Boston to sample the other pastries on the menu!